A couple months back our church hosted a dinner and talent show which included physical and visual talents. I set up a display of items I had recycled and altered, such as; 3D movie glasses, formula cans, Crystal Light containers, file folders, mint tin cans, a lunch bag, toilet paper tubes and an old license plate frame.
Folks were pretty surprised at how nice and useful some projects can be after it's original use.
Welcome to my blog. My blog is mainly for the sharing of the many projects I make either for swaps, for gifts or just because I was inspired by something I saw on the internet and wanted to give it a try as well. I hope you enjoy what you see and if you have any questions be sure to send me a comment.
Monday, June 24, 2013
Goosebumps resist class.
My friend John Petersen who works for Imagine Crafts (Tukineko) came and did a wonderful mini-class for my stamp club using the Goosbumps resist sprays. It was a simple project resulting in a nice finished background piece.
Randomly spritz lightly over the piece of cardstock leaving untouched areas. When dry (dries fast) use felt or linen topped stamp pad in a few colors and rub it across the card stock. Use a paper towel to wipe off the excess ink. Spritz lightly again if you want more color depth. You can also add color to your card before spritzing the first time if you don't want such a stark white background. This product is available in both the big box craft stores and comes in a gloss and matte finish.
Here is a finished card using the piece I create. I used Ranger's Archival black ink to stamp over the background.
Friday, June 21, 2013
Wednesday, May 29, 2013
Monday, April 29, 2013
12 Tags of 2013
Here is my April tag of the month along side Tim's. Not owning any of the Distress Paints that were featured on Tim's tag, it really was a challenge to create. I used, Ranger paint daubers and distress ink pads to create my background.
Monday, April 22, 2013
Mini File Folder Book - Travel themed.
A variation on the File Folder Book.. a smaller size and using 3 folders which allows you to add more pockets and tags.
Recent Tag / Bookmark Swaps
These were all swaps with AFTCM (Art for the Creative Mind) on Yahoo Groups.
The clocks & gears were a Pearl Ex type background swap.
The books and girl reading were for a Bookmark swap.
The two to the left were for a Gold & Green swap.
The clocks & gears were a Pearl Ex type background swap.
The books and girl reading were for a Bookmark swap.
The two to the left were for a Gold & Green swap.
Learning new techniques..
This technique was stamping with lemon juice. We put a paper towel on a paper plate, wet it with the lemon juice (not soaked) and then stamped into the juice and stamped it onto the paper. Use your heat embossing tool to heat the juice until it turns the vintage shade you like. The longer you heat, the darker it gets. It can seem like it takes a long time but the trick is continuous movement and close to the paper. Watch you don't burn your fingers or the paper. This works faster on text weight paper.
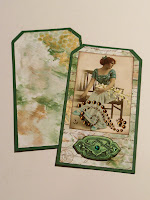
This technique was marbling with acrylic paint by misting
a piece of plastic wrap with water. Using about 3-4 paint
colors that go together with one of them being a metallic,
drop 3 nickel sized drops of each paint randomly on the
plastic. Fold the plastic in half and with fingertips work the
so it spreads all over the plastic. Try to leave the colors
separate only blending where they meet. Using quarter sheet
cut matte cardstock lay a sheet of the cardstock down on the
paint and tap with finger tips so card touches all the paint.
Carefully lift up the card stock and set aside to dry. Continue
until all the paint has transferred to the cards. If you have
blank areas touch those areas back into the paint to cover.
Once dry the papers can be used for backgrounds. On my
samples I used, gold, white, green and tan paints.
Subscribe to:
Posts (Atom)